
An ISO 5211 mounting pad is the flat, drilled flange on top of a quarter-turn valve where an actuator bolts on. If the valve you install today has one, automating it later is a bolt-on job. If it does not, the same upgrade can mean a machined adapter, a second shutdown, or a new valve. That is why the pad belongs on the first purchase order.
This guide is for engineers and buyers who are putting in manual ball valves now but expect some of them to run on air or a control signal later. It covers what the standard fixes and what it leaves open, the three routes from manual to automated, how sanitary ball valves fit in, and what to tell a supplier so the later upgrade stays simple. Where we mention our own valves, the facts come from our product pages.
What is an ISO 5211 mounting pad?
An ISO 5211 mounting pad is the actuator attachment flange defined by ISO 5211, the international standard for attaching part-turn actuators to industrial valves. The standard fixes the flange dimensions and the drive dimensions on the actuator side, so an actuator built to the same flange size can bolt directly onto the valve.
The current edition is ISO 5211:2026, published in February 2026. It replaced the 2023 edition, which in turn replaced the 2017 edition. According to ISO's own summary, the standard covers three things:
- Flange dimensions for attaching a part-turn actuator to a valve, or to an intermediate support such as a bracket.
- Dimensions of the actuator's driving component, the part that engages the valve stem or a coupler.
- Reference torque values for those interfaces and couplings.
Flange sizes are named with an F number, such as F03, F05 or F07. A part-turn actuator is one that turns the valve a fixed angle, usually 90 degrees, which is exactly what a ball valve needs to go from open to closed.
Two other standards often appear on the same drawing, and it helps to know which interface each one controls.
| Standard | Interface it covers | Where you see it on the assembly |
|---|---|---|
| ISO 5211 | Actuator to valve, or actuator to an intermediate support such as a bracket; actuator drive dimensions; reference torques | Top of the valve, underside of the actuator |
| MSS SP-101 | Part-turn actuator mounting dimensions and performance characteristics, with FA flange designations | North American specifications and valve drawings |
| VDI/VDE 3845 (NAMUR) | Actuator to auxiliary equipment: positioners, signal transmitters, compressed air connections | Side and top of the actuator, where the solenoid valve and limit switch box mount |
The Manufacturers Standardization Society revised MSS SP-101 in 2024 as the American standard practice for part-turn actuator attachment. If a specification calls for SP-101, check that with your supplier rather than assuming an ISO 5211 part is a drop-in match. The NAMUR interface, published by VDI as VDI/VDE 3845, sits one level up: it is how a solenoid valve or positioner attaches to the actuator, not how the actuator attaches to the valve.
What ISO 5211 does not settle for you
A shared flange size does not guarantee a working assembly. ISO 5211 standardises the flange and the actuator-side drive, but it does not size the actuator to your valve's torque, it does not set how high the actuator sits above the stem, and it states that attaching an intermediate support to the valve is outside its scope.
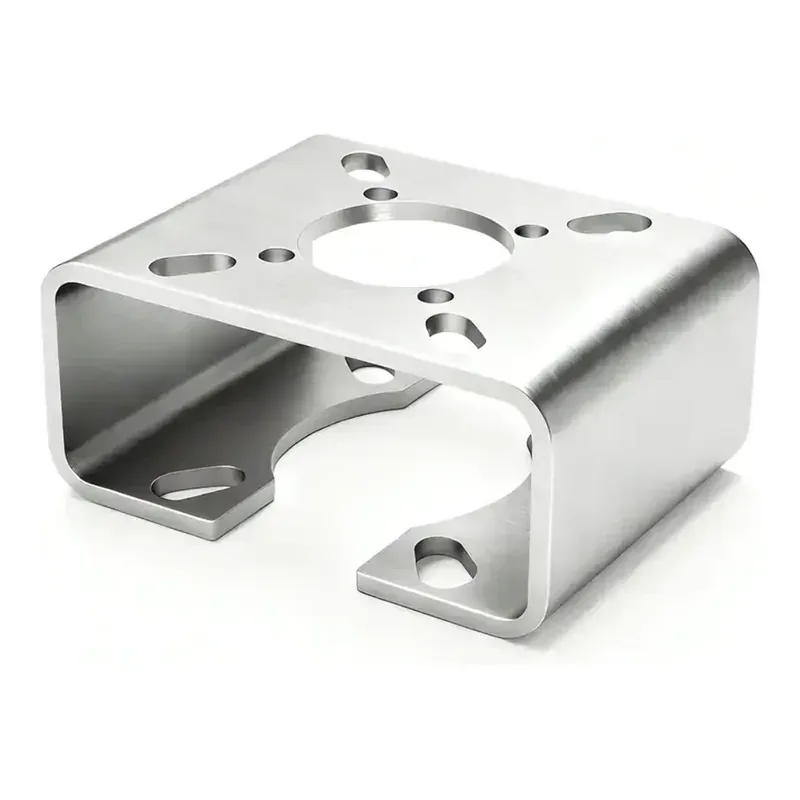
That last point matters when a bracket is involved. ISO's summary of the 2026 edition says plainly that the attachment of the intermediate support to the valve is beyond the scope of the document. The standard defines where the actuator meets the bracket, not where the bracket meets the valve. That is why bracket kits are made for a specific valve: ours bolts to the valve's own ISO 5211 pad and is machined for the valve and actuator pair.
Four other things still need matching even when both parts are "ISO 5211":
The stem drive
The valve stem ends in a drive shape, such as a square or a pair of flats, and the actuator or coupler has to engage it exactly. Our valve actuator mounting bracket and coupler page puts it this way: a coupler that is close but not exact rounds the stem flats over time. That is why couplers are machined to the specific valve and actuator pair.
Actuator size
The flange size tells you the actuator will bolt on. It does not tell you the actuator has enough torque to turn the valve reliably, with margin, at the line's pressure and temperature. Actuator sizing is a pairing decision, made for the valve model and size in question.
Height and heat
A valve pad that takes the actuator directly keeps the assembly short and rigid. On hot service the opposite can be the right answer: a taller bracket sets the actuator back so heat travelling up the stem dissipates before it reaches seals and electronics.
What happens when air is lost
A double acting (DA) actuator uses air for both strokes and holds its last position if air is lost. A spring return (SR) actuator uses air one way and springs drive the valve to a preset open or closed position on air failure. Flange size does not decide this; the process does.
Three ways to get from manual to automated
There are three routes, and two of them need the valve to have an ISO 5211 pad already. Bolt the actuator straight onto the pad, bolt it on through a bracket and coupler kit, or replace a valve that has no pad. Only the first keeps the future job to removing a lever and fitting an actuator to the valve already in the line.
Route 1: pad now, lever now, actuator later
This is the route to plan for whenever automation is likely during the valve's life. You order the build that carries an ISO 5211 pad and have it shipped with a hand lever. The line runs manually until the budget, the control system or the process change arrives. Then the lever comes off and a matched quarter-turn actuator bolts onto the pad. The valve body, its end connections and its position in the pipe stay exactly as they were.
For our sanitary line this is the V-3NM high-mount build. It can ship with a lever today and take a pneumatic actuator later.
Route 2: pad now, actuator later through a bracket and coupler kit
Sometimes the actuator should not sit directly on the pad. A hot line may need the actuator stood off so heat does not reach its seals and electronics. The actuator's drive may not match the valve stem. Or the site may be replacing an old actuator with another brand. In those cases a mounting kit goes between the two: the bracket bolts to the valve's ISO 5211 pad and carries the actuator, and the coupler passes the actuator's output down to the stem.
There is no universal kit. To quote our BL-304 bracket and coupler we need the valve model and size and the actuator model, because the bore, the flats and the height all follow that specific pair. The kit solves real problems, and it adds one more interface to specify, make, align and keep spare. Either way, the valve still needs its pad.
Route 3: replace the valve
Some valves have no actuator mounting pad. Our manual sanitary 3-way valve, the MV-3N, is one of them, and its product page says so directly: an actuator cannot be bolted on afterwards. When that position has to be automated, the valve comes out and the pneumatic build goes in. With Tri-Clamp ends that is clamp work rather than pipe work, but it is still a new valve, a line stop and a fresh commissioning of that position.
| Route | What you buy now | What happens at automation | Work on the line | Best for |
|---|---|---|---|---|
| 1. Pad, direct mount | Valve with ISO 5211 pad, shipped with a lever | Remove lever, bolt a matched actuator to the pad | Valve stays in the line | Positions likely to be automated during the valve's life |
| 2. Pad, bracket and coupler kit | Valve with ISO 5211 pad, shipped with a lever | Order a kit machined for that valve and actuator, then fit it to the pad | Valve stays in the line; kit must be matched and aligned | Hot lines that need stand-off, drive mismatch, a different actuator brand |
| 3. Replace the valve | Valve with no pad | Buy the actuated valve and swap it in | Line stopped and opened; valve replaced (unclamped or cut out, depending on the ends) | Only when the installed valve has no pad |
Sanitary ball valves: is there a standard direct-mount pad?
It depends on the valve family, so check before you buy. Some hygienic valves have no actuator pad at all and stay manual for life. A three-piece sanitary ball valve with an ISO 5211 high-mount pad is the other option: a standard quarter-turn actuator bolts straight onto the valve, with no bracket to fabricate or align.
Sanitary lines make this decision harder because the valve is not only operated, it is also taken apart. Our sanitary ball valves are cleaned by disassembly: the Tri-Clamp ends open with a clamp and no tools, and the three-piece body unbolts in place so the ball, seats and gaskets come out between batches. If you are weighing that approach against cleaning in place, our article on CIP versus COP for sanitary ball valves covers the trade-off. The point for automation is simple: whatever sits on top of the valve must still leave room for that service.
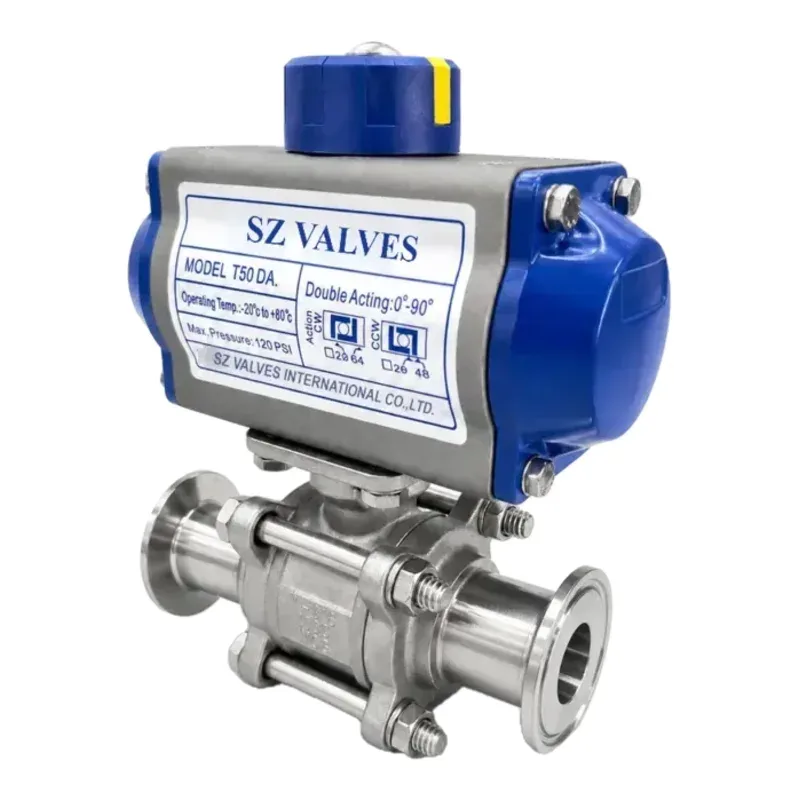
Our pneumatic sanitary ball valve, the V-3NM, is built around this. Its ISO 5211 high-platform pad takes the actuator directly, with no bracket between valve and actuator. The same body comes with Tri-Clamp ferrules (V-3NM) or extended OD-tube ends for butt welding (V-3NM-L3), where the extra length keeps weld heat away from the PTFE seats. It covers eight sizes from 1/2″ to 4″, all full port with the bore matched to the tube inner diameter, rated 1000 WOG, with an A351 CF8M body and ball. The valve is rated −20°C to 180°C, and the standard air supply for the actuator is 4 to 8 bar.
Two-way valves: V-3N or V-3NM
The manual sanitary ball valve, V-3N (Tri-Clamp) and V-3N-L3 (extended weld), runs on a lever with a locking plate. For automation, our product pages point to the V-3NM high-mount build, and that is the one to order if an actuator is likely later. The V-3NM can ship with a lever now and take a pneumatic actuator when the line is automated, so the choice does not force you to buy the actuator on day one.
Three-way valves: MV-3N or MV-3M-TC
Our Tri-Clamp 3-way ball valve comes as the manual MV-3N or the pneumatic MV-3M-TC, in L-port (diverting) or T-port (mixing), 1/2″ to 2″. The manual MV-3N has no actuator mounting pad, so it cannot be automated later. If a diversion will ever need to happen on a signal, order the MV-3M-TC from the start. It carries a rack-and-pinion actuator on an ISO 5211 pad, DA or SR, with the spring set at order time to fall back to the port you nominate.
| Valve | Operation as shipped | Automation later | Order it when |
|---|---|---|---|
| V-3N / V-3N-L3 | Lever with locking plate | For automation, the V-3NM build is the one quoted | The position will stay manual |
| V-3NM / V-3NM-L3 with lever | Lever on an ISO 5211 high-mount pad | Yes: remove the lever, bolt on the actuator | Manual today, automation likely |
| V-3NM / V-3NM-L3 with actuator | Pneumatic, DA or SR | Already automated | Automated from the first day |
| MV-3N | Lever, no actuator mounting pad | No | The diversion will always be done by hand |
| MV-3M-TC | Pneumatic on an ISO 5211 pad, DA or SR | Already automated | Any chance the diversion goes on a signal |
How to decide at purchase time
Ask one question for each valve position: is there a realistic chance this valve will be switched by air or a control signal during its service life? If the answer is yes, buy the pad now. Whatever the pad build adds to today's quote is visible and fixed, while skipping it moves the cost into a future shutdown.
The questions below turn that into a quick review you can run on a P&ID or a valve list before the order goes out.
| Question | If yes | If no |
|---|---|---|
| Could a PLC, timer or interlock ever operate this valve? | Order a valve with an ISO 5211 pad, with a lever for now if the actuator is not yet budgeted | A manual valve is fine |
| Is it a 3-way valve that diverts or mixes? | Decide manual or pneumatic now, and order the pneumatic 3-way if a signal may ever switch it | Carry on with the 2-way questions |
| Must the valve reach a known position if air fails? | Plan for spring return and note the fail direction for the later actuator order | Double acting holds its last position |
| Does the line run hot enough to worry about actuator seals? | Allow for a taller bracket as a stand-off | Direct mount on the pad keeps the assembly compact |
| Will the valve be taken apart for cleaning or service? | Reserve space above and around the valve for the actuator and for disassembly | Reserve space for the actuator height at least |
| Does the site already standardise on an actuator brand? | Tell the valve supplier, so pad, drive and actuator are matched | Let the valve supplier pair the actuator |
What to tell your supplier now if you will automate later
Put the future on today's inquiry. State the valve size, end connections and port, say the valve will be automated later, and ask for the pad build shipped with a lever. If you already know them, add the air supply, DA or SR with fail direction, and the accessories the actuator will carry.
A complete inquiry for a valve that will be automated later covers:
- Size and quantity per size.
- End connections: Tri-Clamp, or extended weld ends for welding into the line.
- For 3-way valves, L-port or T-port, and the seat you need for the line temperature.
- A clear note: lever now, actuator later, ISO 5211 pad required.
- Air supply available at the valve. Our sanitary pneumatic valves are specified for 4 to 8 bar.
- DA or SR, and for SR the position the valve must reach on air loss.
- Accessories: a solenoid valve that mounts NAMUR-direct on the actuator, a limit switch box, or a positioner.
- Marking or private label, if the valves carry your brand.
Two planning details save the most trouble later. First, keep space in the pipe rack for the actuator's height and for the air line and solenoid beside it. Second, keep automated and to-be-automated positions on one valve family with the same pad, so the spare-parts list does not split in two.
When the actuator is ordered with the valve, it is fitted at our plant rather than on site. The V-3NM pneumatic sanitary ball valve is sized, mounted and cycle-tested before it ships, and solenoid valves, limit switch boxes and positioners are fitted at assembly. Every valve is leak tested before shipment. Our OEM and assembly page covers private-label and assembled builds.
Common mistakes when a manual valve is automated later
Most problems come from assuming a valve is ready for an actuator when it is not. Five mistakes come up again and again: a 3-way valve bought manual with no pad, a bracket improvised on site, an actuator chosen by flange size alone, the wrong spring-return direction, and no clearance left for cleaning or service. The budget trap follows them.
Buying the manual 3-way and planning to add air next year
If the manual 3-way valve has no mounting pad, no kit will turn it into an automated one. Automating that position means stopping the line, taking the valve out and installing the pneumatic build. The decision was really made on the day the manual valve was ordered.
Improvising a bracket on site
A bracket welded or cut to fit in the field rarely holds the actuator square above the stem. Misalignment puts side load on the stem, the drive wears, and the valve starts to stick or stop short of fully open or closed. Our bracket kits are machined for the specific valve and actuator pair and bolt to the valve's ISO 5211 pad, which is what keeps everything square.
Choosing the actuator by flange size alone
Two parts with the same F number will bolt together. That says nothing about whether the actuator has enough torque for the valve, or whether its drive matches the stem. Give the supplier the valve model and size and let them pair the actuator.
Getting the spring-return direction wrong
Spring return is chosen because the process needs a defined position on air loss. Order it without stating the fail direction and the valve may fail to the wrong position, which is the opposite of what spring return was bought for. Write the fail direction on the inquiry.
Leaving no room to service the valve
An actuator, a solenoid and an air line all take space. On a sanitary line where the valve is taken apart for cleaning, a tightly packed rack can turn a routine clean into a job that needs the actuator removed first. Reserve the space when the rack is drawn.
Why the automation budget usually comes in low
The actuator is the easy part to price. The costs that get missed are the ones around it: a replacement valve where there is no pad, a line stop to swap it, air and signal lines run to the valve, limit switches set up in the field, and the cleaning and inspection of any line that has to be opened. On a valve that already carries a pad, the valve stays where it is and the job shrinks to fitting the actuator and connecting it.
FAQ
What is an ISO 5211 mounting pad on a ball valve?
It is the flat flange on top of the valve, drilled to a bolt pattern defined by ISO 5211, where a quarter-turn actuator attaches. The standard sets the flange dimensions, the actuator-side drive dimensions and reference torques, so an actuator built to the same flange size can bolt straight on. Flange sizes are labelled F03, F05, F07 and so on. A matching flange size still has to be paired with the right actuator torque and stem drive.
Can I add an actuator to a manual ball valve later?
Yes, if the valve has an ISO 5211 pad. The lever comes off and a matched actuator bolts on, either directly or through a bracket and coupler kit when the line runs hot or the actuator's drive does not match the stem. If the valve has no pad, plan on replacing it with an actuated valve when the time comes. That is why a position that may be automated later should get a padded valve now, shipped with a lever until the actuator is ordered.
Do I need a mounting bracket if my valve has an ISO 5211 pad?
Usually not. If the valve pad and the actuator share the same flange size and the drive matches the stem, the actuator mounts directly, which keeps the assembly short and aligned. A bracket and coupler kit is still the right choice on hot lines, where extra height keeps heat away from the actuator's seals and electronics, and when the actuator's drive does not match the valve stem. ISO 5211 does not cover how a bracket attaches to the valve, so that part is matched per combination.
Is ISO 5211 the same as NAMUR?
No. ISO 5211 covers the interface between the valve and the actuator: the mounting flange and the drive. NAMUR, published as VDI/VDE 3845, covers the interface between the actuator and its accessories, such as solenoid valves, positioners and limit switch boxes, plus the compressed air connections. A typical pneumatic ball valve uses both: ISO 5211 underneath the actuator and NAMUR on its side and top. Specifying one does not specify the other.
Can a sanitary ball valve be automated after installation?
It depends on the valve. A three-piece sanitary ball valve with an ISO 5211 high-mount pad can run on a lever and take a pneumatic actuator later without leaving the line. Our V-3NM is built this way, in Tri-Clamp or extended weld ends from 1/2″ to 4″. A sanitary valve without a pad cannot simply be converted. Our manual 3-way MV-3N is one example, so a diversion that may ever need a signal should be ordered as the pneumatic MV-3M-TC.
The short version
The cheapest time to prepare a valve for automation is before it is installed. Choose valves with an ISO 5211 mounting pad for any position that may be switched by air or a control signal, ship them with a lever if the actuator is not budgeted yet, and write the future actuator's air supply, fail direction and accessories on today's inquiry. For 3-way positions, if the diversion may ever be automatic, buy the pneumatic valve now.
If you are laying out a line and want the pad build quoted with a lever, send the sizes, end connections and the positions you expect to automate through our contact page.